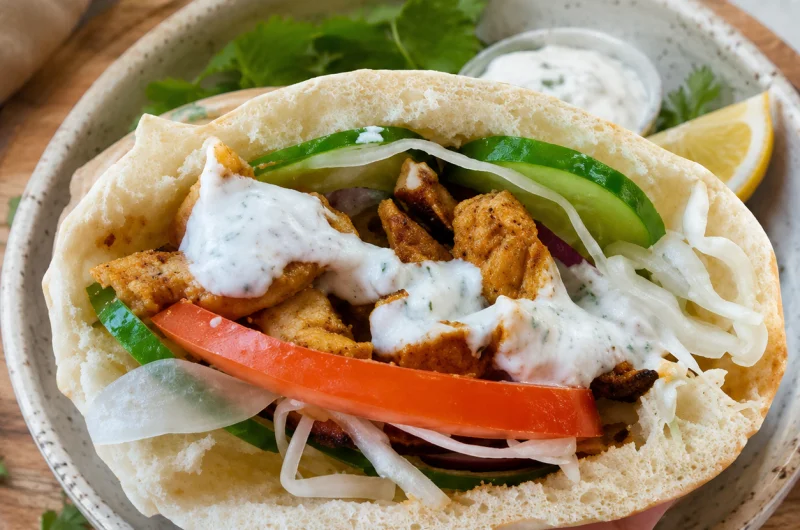
There is something incredibly satisfying about making Homemade Overnight Sourdough Pita Bread from scratch. These naturally fermented pitas are soft, flexible, lightly chewy, and deliciously fresh, with the classic pocket that makes pita perfect for filling with chicken, falafel, hummus, vegetables, eggs, and more.
Made with just a handful of simple ingredients—active sourdough starter, water, olive oil, flour, and salt—this recipe relies on natural fermentation instead of commercial yeast. The dough is prepared ahead of time, fermented at room temperature, refrigerated overnight, and baked the next day on a very hot surface.
The overnight fermentation makes this recipe especially convenient. Most of the work happens the day before, so when you’re ready to bake, you simply divide, shape, roll, and cook the dough. With a properly active starter and a thoroughly preheated baking surface, the pitas can puff dramatically in the oven, creating the familiar hollow center.
Why You’ll Love This Sourdough Pita Recipe
- Naturally fermented: Made with an active sourdough starter instead of commercial yeast.
- Overnight preparation: The dough can ferment in the refrigerator while you sleep.
- Soft and flexible: Proper fermentation and high-heat baking create tender, chewy pita.
- Homemade flavor: Freshly baked pita tastes far better than many store-bought versions.
- Simple ingredients: You only need five main ingredients.
- Freezer-friendly: Bake a large batch and freeze extras for later.
- Versatile: Perfect for sandwiches, wraps, dips, breakfast, and snacks.
- No complicated equipment: A baking steel, pizza stone, cast-iron surface, or heavy baking sheet can work.
What Makes Sourdough Pita Different?
Traditional pita gets its characteristic pocket from steam. When a thin piece of dough hits an extremely hot baking surface, the moisture inside rapidly turns into steam.
That steam pushes the layers of dough apart, creating the hollow pocket in the center.
Sourdough pita takes this process a step further by using natural fermentation. The sourdough starter helps ferment the dough over several hours, developing flavor and improving the dough’s texture.
The combination of proper fermentation + even rolling + intense heat is the key to getting pita that puffs.
Ingredients
Active Sourdough Starter
100 g active sourdough starter
Use a starter that has been recently fed and is visibly active, bubbly, and rising well. Since this recipe depends on natural fermentation, an active starter is one of the most important ingredients.
Water
300 g lukewarm water
Lukewarm water helps create a comfortable environment for the starter. Avoid using very hot water, as excessive heat can negatively affect the microorganisms in the starter.
Olive Oil
25 g olive oil
Olive oil adds a little richness and helps keep the finished pita soft and flexible.
Flour
500 g bread flour or all-purpose flour
Either flour can be used. Bread flour may produce a slightly chewier pita, while all-purpose flour can create a softer texture.
For the most consistent results, weighing the flour with a digital kitchen scale is recommended.
Fine Sea Salt
10 g fine sea salt
Salt enhances the flavor of the pita and also helps regulate fermentation.
Additional Flour
You’ll need a small amount of extra flour for dusting the work surface and shaping the dough.
Try not to use excessive flour during shaping because too much added flour can make the dough drier and more difficult to puff.
How to Choose an Active Sourdough Starter
The activity of your starter can make a significant difference in this recipe.
Before beginning, your starter should:
- Look bubbly and active.
- Have risen noticeably after feeding.
- Contain bubbles throughout.
- Have a pleasant fermented aroma.
- Be capable of fermenting dough efficiently.
The exact amount of time required for a starter to become active varies depending on temperature, feeding schedule, and starter strength. Instead of relying only on a specific number of hours, look for visible signs of activity.
If your starter is sluggish or hasn’t risen well after feeding, give it more time before beginning the pita dough.
How to Make Overnight Sourdough Pita Bread
Step 1: Mix the Sourdough Starter, Water, and Olive Oil
Add the active sourdough starter, lukewarm water, and olive oil to a large mixing bowl.
Stir until the starter is mostly dispersed throughout the water.
It doesn’t need to be perfectly smooth at this stage.
Step 2: Add the Flour and Salt
Add the flour and fine sea salt to the bowl.
Mix with a wooden spoon, dough whisk, or your hands until the ingredients come together and no large patches of dry flour remain.
The dough may look rough and slightly sticky at this point. That’s completely normal.
Avoid adding lots of extra flour. A soft dough is helpful for creating pita that stretches easily and puffs well.
Step 3: Rest the Dough
Cover the bowl and allow the dough to rest for approximately 20–30 minutes.
This short rest gives the flour time to absorb the water and allows the dough to begin developing gluten.
After resting, the dough should feel more cohesive and easier to handle.
Step 4: Knead the Dough
Knead the dough for approximately 5–7 minutes.
You can knead by hand or use a stand mixer fitted with a dough hook.
Work the dough until it becomes smoother and more elastic. It should remain soft and slightly tacky but shouldn’t be excessively sticky.
Try not to correct a slightly sticky dough by continually adding flour. Too much flour can make the pita dense and reduce its ability to puff.
Step 5: Bulk Ferment at Room Temperature
Place the kneaded dough back into the bowl and cover it.
Allow it to ferment at room temperature for approximately 3–5 hours.
The exact timing will depend on the temperature of your kitchen and the strength of your sourdough starter.
Rather than waiting for the dough to completely double, look for signs that fermentation is progressing. The dough should become:
- Lighter
- Smoother
- More elastic
- Slightly expanded
- Approximately 40–50% larger
A warmer kitchen may shorten the fermentation time, while a cooler kitchen may require additional time.
Step 6: Refrigerate Overnight
Once the dough has completed its room-temperature fermentation, cover the bowl tightly and place it in the refrigerator.
Let it ferment for approximately 8–16 hours.
This overnight cold fermentation develops the sourdough flavor while making the dough easier to handle the next day.
The chilled dough will also become firmer, which makes dividing and shaping much easier.
Preparing the Dough the Next Day
Step 7: Bring the Dough Out of the Refrigerator
Remove the dough from the refrigerator and allow it to sit at room temperature for approximately 20–30 minutes.
It doesn’t need to become completely warm. The short rest simply takes the chill off the dough and makes it easier to divide.
Step 8: Divide the Dough
Turn the dough onto a lightly floured work surface.
Divide it into 15 equal portions, approximately 62 g each.
Using a kitchen scale is helpful because evenly sized dough balls will bake more consistently.
Step 9: Shape the Dough Balls
Take one portion at a time and shape it into a smooth ball.
Create a reasonably taut outer surface without tearing the dough.
Place the finished dough balls on a lightly floured surface or parchment-lined tray.
Keep them covered with a clean kitchen towel or plastic wrap while shaping the remaining portions. This prevents the dough from drying out.
Step 10: Rest the Dough Balls
Cover the dough balls and allow them to rest for approximately 30–45 minutes.
This resting period is important because it allows the gluten to relax.
If you try to roll the dough immediately after shaping, it may resist stretching or quickly shrink back.
A relaxed dough ball will roll much more easily and evenly.
Preparing the Oven
The oven and baking surface need to be extremely hot.
Place one of the following inside your oven:
- Baking steel
- Pizza stone
- Cast-iron baking surface
- Heavy inverted baking sheet
Preheat the oven to 500°F (260°C) for at least 45 minutes.
Do not rush this step.
The baking surface needs enough time to become thoroughly hot. A properly heated surface is one of the most important factors in getting pita to puff.
How to Roll Sourdough Pita
Take one rested dough ball and place it on a lightly floured work surface.
Using a rolling pin, gently roll it into a circle approximately 5–6 inches wide and about ⅛ inch thick.
Try to keep the dough evenly thin from the center to the edges.
An unevenly rolled pita may puff only partially because the steam cannot separate the layers evenly.
Avoid pressing too aggressively or tearing the dough.
Keep the remaining dough balls covered while you work.
Before baking, gently brush or shake off any excess flour from the surface. Loose flour can burn on the extremely hot baking surface.
How to Bake Sourdough Pita
Carefully place 2–3 rolled pita rounds onto the fully preheated baking surface.
Bake for approximately 2–4 minutes.
Watch closely as the pita begins to heat.
Within a short time, steam should begin forming inside the dough, causing it to inflate. A successful pita can puff dramatically into a large balloon-like shape.
The pita does not need to become deeply browned. Once it has puffed and appears cooked through with light coloring, remove it from the oven.
Continue baking the remaining pita rounds.
The Secret to Getting Pita to Puff
Getting that beautiful pita pocket is mostly about technique and temperature.
1. Use an Active Starter
Your starter needs to be strong enough to ferment the dough properly.
2. Ferment the Dough Correctly
Under-fermented dough may not have the structure or extensibility needed for good puffing.
3. Don’t Add Too Much Flour
A stiff, dry dough is harder to stretch and can be less likely to puff.
4. Roll the Dough Evenly
An evenly thin circle gives steam the best chance of separating the layers.
5. Don’t Tear the Dough
Small tears or cracks can allow steam to escape.
6. Use a Very Hot Baking Surface
The surface should be thoroughly preheated before the first pita goes in.
7. Don’t Overwork the Rolled Dough
Handle each round gently when transferring it to the oven.
How to Keep Homemade Pita Soft
As soon as each pita comes out of the oven, place it on a plate or in a clean basket and cover it with a clean kitchen towel.
The trapped warmth and moisture help keep the pita soft and flexible.
The pitas may deflate as they cool, which is completely normal. The pocket should remain inside, allowing you to open the pita and add your favorite fillings.
What If My Pita Doesn’t Puff?
Don’t worry if some of your pitas don’t puff perfectly.
There are several reasons this can happen, including:
- The baking surface wasn’t hot enough.
- The dough was rolled unevenly.
- The dough was under-fermented.
- The dough was over-fermented.
- The pita was torn during shaping.
- Too much flour was incorporated.
- The dough was folded or creased during transfer.
- The oven temperature was too low.
Even a pita without a perfect pocket is still delicious. Use it as flatbread, a wrap, or serve it alongside hummus and other dips.
What to Serve with Sourdough Pita
Homemade sourdough pita is incredibly versatile and works with almost any filling.
Chicken Pita
Fill warm pita with grilled or roasted chicken, lettuce, cucumber, tomatoes, and your favorite sauce.
Falafel Pita
Add crispy falafel, hummus, fresh vegetables, pickles, and tahini sauce.
Breakfast Pita
Stuff the pocket with scrambled eggs, cheese, avocado, or cooked vegetables for an easy breakfast.
Hummus and Pita
Cut warm pita into wedges and serve with hummus, baba ganoush, or another favorite dip.
Vegetable Pita
Fill with roasted or fresh vegetables, greens, herbs, and your favorite dressing.
Gyro-Style Pita
Use the pita as a base for seasoned meat, lettuce, tomatoes, onions, and creamy yogurt sauce.
Storage Instructions
Allow the pita breads to cool completely before storing.
Place them in an airtight container or resealable bag.
They can be kept at room temperature for approximately 2 days.
For longer storage, freezing is recommended.
How to Freeze Sourdough Pita
Homemade pita freezes very well.
- Allow the pitas to cool completely.
- Stack them together with parchment paper between individual breads if desired.
- Place them in a freezer-safe bag or airtight container.
- Remove as much excess air as possible.
- Freeze for up to 3 months.
When you’re ready to eat them, thaw at room temperature and warm briefly in a skillet, oven, or microwave.
Tips for the Best Sourdough Pita
- Use a strong, active starter for reliable fermentation.
- Weigh your ingredients for the most consistent results.
- Keep the dough soft and slightly tacky.
- Don’t add excessive flour while kneading or shaping.
- Pay attention to the dough rather than following fermentation times blindly.
- Allow the dough balls to rest before rolling.
- Roll each pita evenly and thinly.
- Preheat your baking surface for at least 45 minutes.
- Keep unused dough covered so it doesn’t develop a dry skin.
- Remove excess flour before baking.
- Cover freshly baked pita with a clean towel to keep it soft.
Frequently Asked Questions
Can I use all-purpose flour?
Yes. All-purpose flour works well in this recipe. Bread flour can also be used if you prefer a slightly chewier texture.
Do I have to use a sourdough starter?
Yes, if you want to make this naturally fermented sourdough version. The starter provides the fermentation needed in place of commercial yeast.
How active should my starter be?
Your starter should be recently fed, bubbly, visibly active, and rising well. A weak starter may result in slow or incomplete fermentation.
Can I make the dough entirely in one day?
The recipe is designed around an overnight cold fermentation, which helps develop flavor and makes the process convenient. You can adjust fermentation based on your starter and kitchen temperature, but the overnight schedule is recommended for this version.
Why does my dough keep shrinking when I roll it?
The gluten may need more time to relax. Cover the dough and allow the individual balls to rest for another 10–15 minutes before trying again.
Why is my pita not forming a pocket?
The most common causes are insufficient heat, uneven rolling, fermentation issues, or damage to the dough. Make sure the baking surface is fully preheated and roll the dough evenly.
Can I cook pita on the stovetop?
Yes, pita can also be cooked on a very hot cast-iron skillet or heavy pan. However, the extremely high heat of an oven and preheated baking surface can make puffing easier.
Can I freeze sourdough pita?
Yes. Baked pita can be frozen for up to approximately 3 months when properly wrapped.
Recipe Card
Homemade Overnight Sourdough Pita Bread
Prep Time: 35 minutes
Room-Temperature Fermentation: 3–5 hours
Cold Fermentation: 8–16 hours
Additional Resting Time: 50–75 minutes
Bake Time: 2–4 minutes per batch
Total Active Time: Approximately 1 hour
Yield: 15 pita breads
Oven Temperature: 500°F (260°C)
Ingredients
- 100 g active sourdough starter
- 300 g lukewarm water
- 25 g olive oil
- 500 g bread flour or all-purpose flour
- 10 g fine sea salt
- Additional flour for dusting
Instructions
- Add the active sourdough starter, lukewarm water, and olive oil to a large mixing bowl. Stir to combine.
- Add the flour and salt. Mix until a rough, soft dough forms.
- Cover and rest for 20–30 minutes.
- Knead for 5–7 minutes until smoother and elastic.
- Cover and let the dough ferment at room temperature for 3–5 hours, or until it has visibly expanded by approximately 40–50%.
- Cover tightly and refrigerate for 8–16 hours.
- The next day, remove the dough from the refrigerator and let it sit at room temperature for 20–30 minutes.
- Divide the dough into 15 portions of approximately 62 g each.
- Shape each portion into a smooth ball.
- Cover and rest the dough balls for 30–45 minutes.
- Place a baking steel, pizza stone, cast-iron surface, or heavy baking sheet in the oven.
- Preheat the oven to 500°F (260°C) for at least 45 minutes.
- Roll each dough ball into a 5–6 inch circle approximately ⅛ inch thick.
- Carefully transfer 2–3 pita rounds to the hot baking surface.
- Bake for 2–4 minutes, or until the pita puffs and is lightly colored.
- Remove from the oven and immediately cover with a clean kitchen towel.
- Repeat with the remaining dough.
- Serve warm with your favorite fillings or dips.
Recipe Notes
- Use a strong, active sourdough starter for the best fermentation.
- The dough should remain soft and slightly tacky; avoid adding excessive flour.
- Fermentation time depends on the temperature of your kitchen and the activity of your starter.
- A thoroughly preheated baking surface is essential for good puffing.
- Roll the dough evenly to encourage the formation of a pocket.
- Keep unused dough covered while shaping and rolling.
- Cover freshly baked pita with a clean towel to help maintain softness.
- Store at room temperature for up to 2 days or freeze for up to 3 months.
- If a pita doesn’t puff completely, use it as flatbread, a wrap, or serve it with hummus.
Final Thoughts
These Homemade Overnight Sourdough Pita Breads are a wonderful way to turn a simple sourdough starter into something incredibly useful and delicious. The dough is soft and easy to work with, the overnight fermentation develops wonderful flavor, and the high-heat baking process creates the characteristic pita pocket.
Once you understand the importance of an active starter, relaxed dough, even rolling, and a thoroughly heated baking surface, homemade pita becomes much easier to master.
Serve these warm pitas with hummus, falafel, grilled chicken, scrambled eggs, roasted vegetables, or your favorite fillings. They’re also delicious simply torn into pieces and served alongside your favorite dip.

