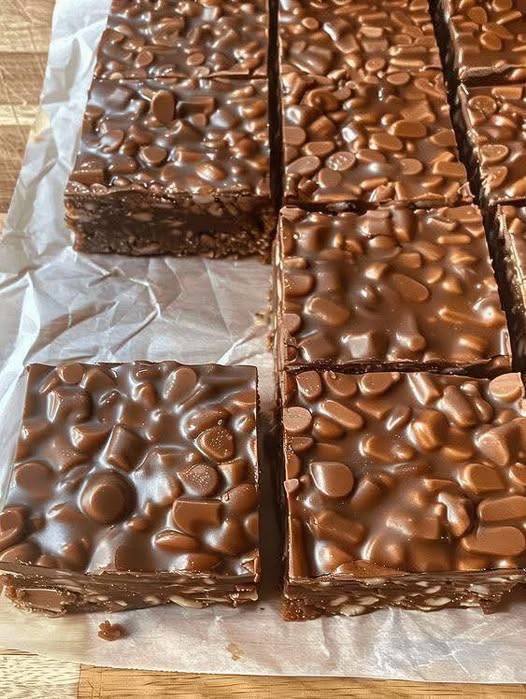
These Healthy No-Bake Peanut Butter Chocolate Bars are an easy, delicious treat made with just a handful of simple ingredients. With a soft peanut butter and oat flour base topped with a smooth layer of chocolate and peanut butter, they have all the flavors of a classic peanut butter cup in an effortless homemade dessert.
Best of all, there’s no oven required. The peanut butter base comes together in minutes, the chocolate topping melts quickly in the microwave, and the bars simply need time in the freezer to set.
Whether you’re looking for a quick dessert, an afternoon snack, or a make-ahead treat, these no-bake peanut butter bars are an easy recipe to keep on hand.
Why You’ll Love These Peanut Butter Bars
- No baking required: No need to preheat the oven.
- Quick preparation: The ingredients come together in about 10 minutes.
- Simple ingredients: Peanut butter, maple syrup, oat flour, and chocolate do most of the work.
- Rich peanut butter flavor: The creamy peanut butter base pairs beautifully with the chocolate topping.
- Sweet and salty: Salted peanut butter balances the sweetness of the maple syrup and chocolate.
- Make-ahead friendly: Store the finished bars in the refrigerator or freezer.
- Easy to portion: One batch makes 12 convenient bars.
Ingredients
For the Peanut Butter Base
- 1 cup salted peanut butter
- ¼ cup + 1 tablespoon maple syrup
- ¾ cup certified gluten-free oat flour
Alternative: You can use 1 cup almond flour instead of the oat flour.
If using unsalted peanut butter, add a small pinch of salt to the base.
For the Chocolate Topping
- 1 cup chocolate chips
- ½ cup peanut butter
Equipment
- Medium mixing bowl
- 8×8-inch baking dish
- Parchment paper
- Microwave-safe bowl
- Spatula or spoon
How to Make No-Bake Peanut Butter Chocolate Bars
1. Prepare the Pan
Line an 8×8-inch dish with parchment paper, leaving some paper hanging over the sides.
This step isn’t essential, but it makes removing the chilled bars much easier. It also helps you lift the entire slab from the dish before slicing.
2. Make the Peanut Butter Base
Add the peanut butter, maple syrup, and oat flour to a medium mixing bowl.
Stir until everything is thoroughly combined and the mixture forms a thick, cohesive dough-like consistency.
If you’re using unsalted peanut butter, add a small pinch of salt to balance the sweetness.
3. Press the Base Into the Dish
Transfer the peanut butter mixture to the prepared 8×8-inch dish.
Use a spatula, the back of a spoon, or clean hands to press the mixture firmly and evenly across the bottom of the dish.
Pay particular attention to the corners and edges. A firmly packed base will hold together better when the bars are sliced.
4. Make the Chocolate Peanut Butter Topping
Place the chocolate chips and ½ cup peanut butter in a microwave-safe bowl.
Microwave for 30 seconds, then remove the bowl and stir.
Continue heating in additional 30-second intervals, stirring thoroughly after each interval, until the chocolate is completely melted and the mixture is smooth.
Avoid overheating the chocolate. Short heating intervals give you better control and help prevent the chocolate from becoming scorched or overly thick.
5. Add the Chocolate Layer
Pour the melted chocolate and peanut butter mixture over the prepared peanut butter base.
Use a spatula or the back of a spoon to spread the topping evenly from edge to edge.
Try to create an even layer so that every bar has a similar amount of chocolate topping.
6. Freeze Until Firm
Place the dish in the freezer and allow the bars to chill for approximately 1 hour.
This gives the chocolate topping enough time to become firm and allows the peanut butter base to set.
Don’t rush this step. Cutting the bars before they’re properly chilled can cause the layers to separate or make the chocolate difficult to slice cleanly.
7. Slice and Serve
Once the bars are firm, remove the dish from the freezer.
Use the parchment paper to lift the entire slab from the dish and transfer it to a cutting board.
Using a sharp knife, cut the slab into 12 bars.
If the bars are extremely firm, allow them to sit at room temperature for a few minutes before slicing.
For cleaner cuts, wipe the knife between slices if chocolate begins sticking to the blade.
Tips for Making the Best Peanut Butter Bars
Use salted peanut butter
Salted peanut butter provides a subtle savory contrast to the maple syrup and chocolate. If you’re using unsalted peanut butter, simply add a small pinch of salt to the base.
Press the base firmly
A tightly packed base is less likely to crumble when you cut the finished bars. Take a little extra time to spread and compact the mixture evenly.
Don’t overheat the chocolate
Microwave the chocolate in short intervals and stir between each one. Chocolate can burn easily, so gentle heating is better than one long microwave cycle.
Use parchment paper
Parchment makes the entire recipe easier. It allows you to lift the chilled bars out of the dish and makes cutting much simpler.
Let the bars fully set
Give the bars the full 60 minutes in the freezer. This helps the chocolate topping firm up and allows the base to become easier to slice.
Choose your preferred storage method
Keep the bars in the refrigerator for a softer, more bite-friendly texture, or store them in the freezer if you prefer them firmer.
Can I Use Almond Flour?
Yes. The recipe can be made with 1 cup of almond flour instead of the ¾ cup of oat flour.
The texture may be slightly different, but almond flour works as an alternative for the base.
If you need the recipe to be gluten-free, make sure your oat flour is specifically certified gluten-free.
What Kind of Peanut Butter Should I Use?
For the most consistent results, use a peanut butter with a smooth, easily stirred consistency.
Salted peanut butter is especially good because it provides the sweet-and-salty contrast that complements the maple syrup and chocolate.
If your peanut butter has separated, stir it thoroughly before measuring so the oil and solids are evenly incorporated.
Can I Use a Different Chocolate?
Yes. Milk chocolate, semi-sweet chocolate, or dark chocolate can all work depending on how sweet you want the finished bars to be.
Dark chocolate will provide a deeper, less-sweet contrast to the peanut butter and maple syrup, while milk chocolate will make the bars sweeter and more dessert-like.
How to Store the Bars
In the Refrigerator
Place the finished bars in an airtight container and refrigerate them.
They will remain firm but should have a softer texture than when frozen.
If stacking the bars, place parchment paper between the layers to prevent them from sticking together.
In the Freezer
For longer storage or a firmer texture, keep the bars in a freezer-safe container or bag.
Separate individual bars with parchment paper so you can remove them one at a time.
Allow a frozen bar to sit at room temperature briefly before eating if you prefer a softer peanut butter layer.
Make-Ahead Dessert
These bars are especially convenient for preparing ahead of time.
Make the entire batch, allow it to set completely, slice it into individual portions, and store the bars in the refrigerator or freezer.
That way, you have a homemade peanut butter chocolate treat ready whenever you want one.
Serving Ideas
These bars are delicious straight from the refrigerator or freezer and don’t require any additional toppings.
For a little extra indulgence, you could serve them with:
- Fresh berries
- Sliced banana
- A drizzle of peanut butter
- A sprinkle of chopped peanuts
- A light dusting of flaky sea salt
- A little extra melted chocolate
Because the bars are already rich and flavorful, simple toppings are usually all you need.
Frequently Asked Questions
Do I need to bake these peanut butter bars?
No. This is a completely no-bake recipe. The only heating required is melting the chocolate and peanut butter in the microwave.
Why are my bars falling apart?
The base may not have been pressed firmly enough into the dish, or the bars may not have been chilled long enough. Make sure to compact the base well and give the bars the full hour in the freezer.
Why is my chocolate topping too thick?
The chocolate may have been overheated or the mixture may have cooled before it was spread. Warm it gently in short intervals and stir until smooth.
Can I make these bars ahead of time?
Yes. They are ideal for making ahead. Store them in the refrigerator or freezer until you’re ready to serve them.
Can I use natural peanut butter?
You can, but make sure it is thoroughly stirred before measuring. Natural peanut butter can separate more easily, and unevenly incorporated oil may affect the consistency of the bars.
Recipe Card
Healthy No-Bake Peanut Butter Chocolate Bars
Prep Time: 10 minutes
Freezing Time: 1 hour
Total Time: 1 hour 10 minutes
Yield: 12 bars
Course: Dessert, Snack
Cuisine: American
Ingredients
For the Base:
- 1 cup salted peanut butter
- ¼ cup + 1 tablespoon maple syrup
- ¾ cup certified gluten-free oat flour
For the Topping:
- 1 cup chocolate chips
- ½ cup peanut butter
Instructions
- Line an 8×8-inch dish with parchment paper.
- In a medium bowl, mix the peanut butter, maple syrup, and oat flour until thoroughly combined.
- Press the mixture firmly and evenly into the prepared dish.
- Add the chocolate chips and ½ cup peanut butter to a microwave-safe bowl.
- Microwave in 30-second intervals, stirring between each interval, until completely melted and smooth.
- Pour the chocolate mixture over the peanut butter base and spread evenly.
- Freeze for 60 minutes, or until firm.
- Lift the chilled slab from the dish using the parchment paper and cut into 12 bars.
- Serve immediately or store in the refrigerator or freezer.
Recipe Notes
- Use salted peanut butter for a balanced sweet-and-salty flavor. If using unsalted peanut butter, add a pinch of salt to the base.
- For an alternative to oat flour, use 1 cup almond flour.
- Use certified gluten-free oat flour if you need the recipe to be gluten-free.
- Microwave the chocolate in short intervals to prevent overheating.
- For easier slicing, allow the frozen bars to sit at room temperature for a few minutes before cutting.
- Store leftovers in an airtight container in the refrigerator or freezer.
Final Thoughts
These Healthy No-Bake Peanut Butter Chocolate Bars prove that a delicious homemade dessert doesn’t need to involve complicated ingredients or a hot oven.
The soft, chewy peanut butter base pairs perfectly with the rich chocolate topping, while maple syrup adds just the right amount of sweetness. With only a few minutes of hands-on preparation and an hour of chilling time, you’ll have a batch of satisfying bars ready to enjoy.
Keep them in the refrigerator for a softer bite or in the freezer for a firmer, chilled treat. Either way, these simple peanut butter chocolate bars are an easy recipe you’ll want to make again and again.

