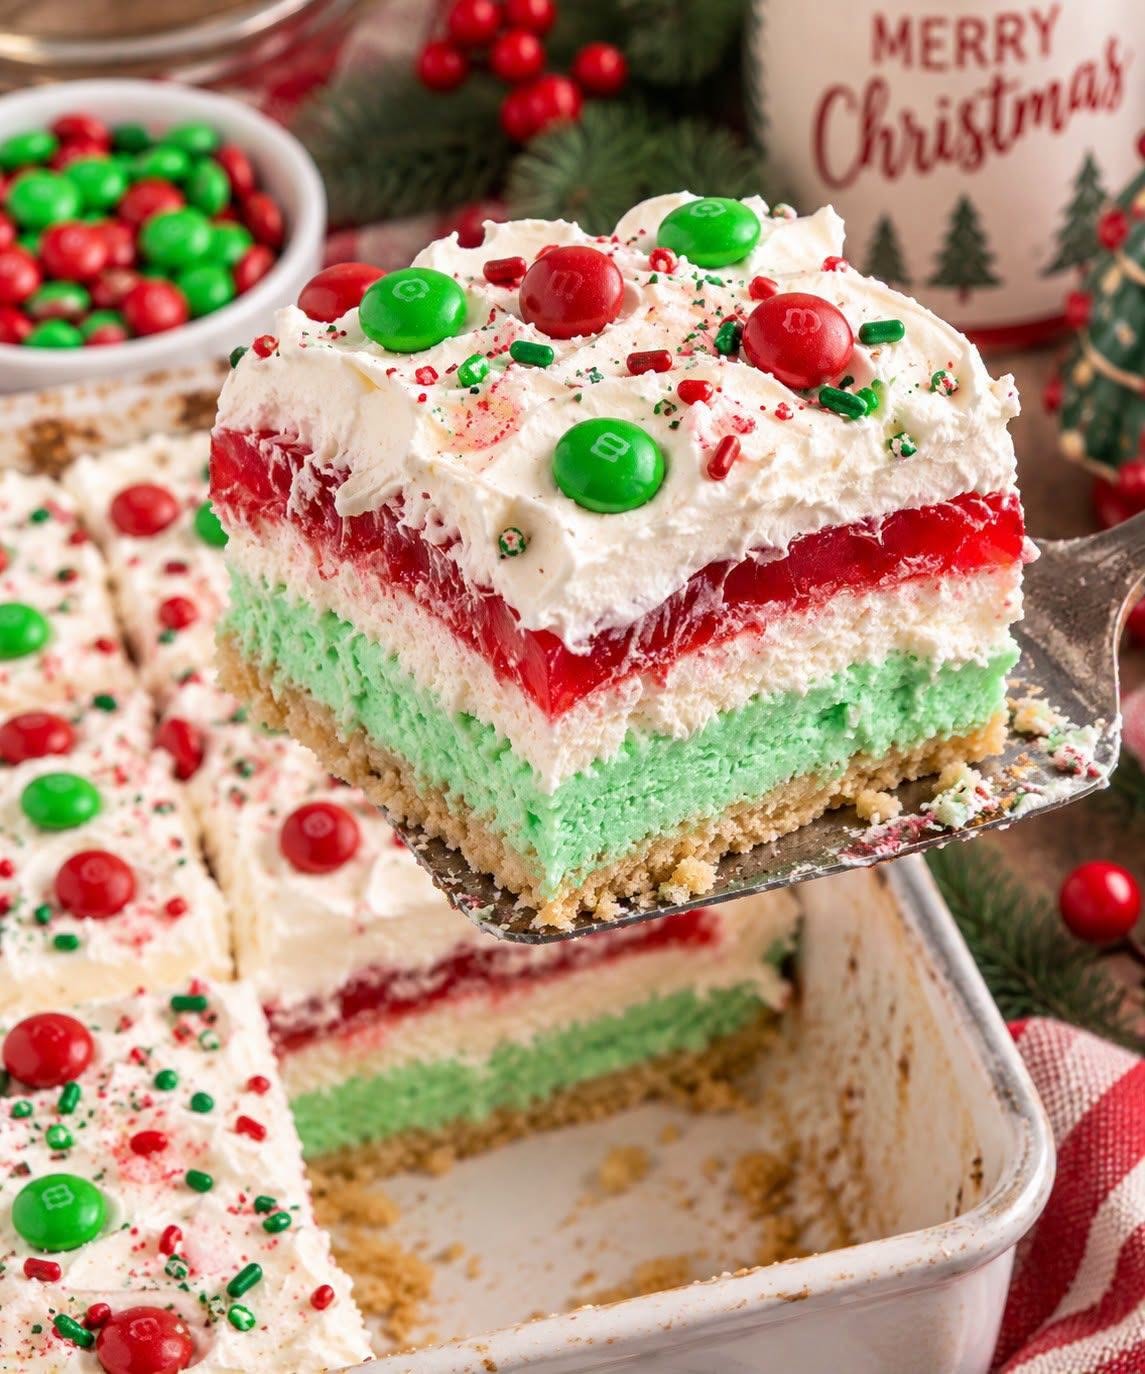
This gorgeous Christmas layered dessert is made with a buttery cookie crust, a creamy mint-green cheesecake layer, a fluffy white cream layer, a vibrant cherry-red gelatin layer, and a festive whipped-cream topping covered with red-and-green candies and sprinkles.
It’s the kind of dessert that looks like you spent all day making it—but most of the work is simply mixing, layering, and chilling. The finished dessert is creamy, fluffy, slightly tangy, sweet, and wonderfully festive.
🎄 Christmas Layered Dessert Bars
Yield: 12–16 servings
Prep time: 45 minutes
Baking time: 8–10 minutes
Chilling time: 4–6 hours
Total time: About 5–7 hours
Pan: 9 × 13-inch baking dish
🛒 Ingredients
1. Buttery Cookie Crust
You’ll need:
- 2½ cups (about 250 g) finely crushed vanilla cookies
- ½ cup (113 g) unsalted butter, melted
- 2 tablespoons granulated sugar
- ¼ teaspoon salt
What cookies can you use?
You can use:
- Vanilla wafers
- Shortbread cookies
- Graham crackers
- Digestive biscuits
- Golden sandwich cookies with the filling removed
For the dessert pictured, a light-colored cookie crust works particularly well because it gives you that beautiful contrast with the green and red layers.
💚 2. Minty Green Cream Layer
- 8 oz (225 g) cream cheese, softened
- ½ cup (60 g) powdered sugar
- 1 teaspoon vanilla extract
- ½ teaspoon peppermint extract
- 2–3 drops green food coloring
- 1 cup (240 ml) whipped topping, thawed
Important
Don’t use too much peppermint extract. Peppermint becomes quite strong very quickly.
If you prefer a more subtle flavor, start with ¼ teaspoon, taste the mixture, and add more if desired.
🤍 3. White Cheesecake Cream Layer
- 8 oz (225 g) cream cheese, softened
- ½ cup (60 g) powdered sugar
- 1 teaspoon vanilla extract
- 1½ cups (360 ml) whipped topping
For a richer homemade version, you can substitute stabilized whipped cream.
❤️ 4. Red Gelatin Layer
- 1 package (3 oz / 85 g) cherry gelatin
- 1 cup boiling water
- ½ cup cold water
- 1 cup chopped strawberries or cherries, optional
Cherry gelatin gives you the deep red color seen in the dessert.
Strawberry gelatin works just as well and gives the dessert a slightly different fruity flavor.
☁️ 5. Topping
- 2 cups whipped topping
- Red candies
- Green candies
- Red sprinkles
- Green sprinkles
- Christmas nonpareils
- Crushed peppermint candy, optional
For a look similar to the photograph, use a mixture of large red and green candies plus tiny red, green, and white sprinkles.
👩🍳 Step-by-Step Instructions
Step 1: Prepare Your Pan
Lightly grease a 9 × 13-inch baking dish.
For easier removal, you can also line the bottom with parchment paper, leaving a little overhang along the sides.
This is especially helpful if you’re planning to lift the entire dessert out and cut it into neat squares.
Set the pan aside.
Step 2: Make the Cookie Crust
Place the cookies in a food processor and pulse until they become very fine crumbs.
You want the texture to resemble sand.
If you don’t have a food processor, place the cookies inside a zip-top bag and crush them with a rolling pin.
Measure 2½ cups of crumbs.
Add:
- Melted butter
- Sugar
- Salt
Mix thoroughly.
Every crumb should be lightly coated with butter.
How to tell if it’s ready
Grab a small amount of the mixture and squeeze it in your hand.
It should hold together.
If it still feels extremely dry and falls apart immediately, add 1 tablespoon additional melted butter.
Step 3: Press the Crust Into the Pan
Pour the crumb mixture into your prepared baking dish.
Spread it evenly.
Then press it down firmly.
A flat-bottomed measuring cup works beautifully for this.
Pay special attention to the corners because loose crumbs around the edges can cause the finished dessert to crumble when sliced.
Step 4: Bake the Crust
Bake at:
350°F (175°C) for 8–10 minutes.
You aren’t trying to brown the crust heavily.
You’re simply setting the butter and creating a firmer base.
Remove from the oven and place the pan on a cooling rack.
Let it cool completely.
This is important.
Do not add the cream layer to a warm crust.
A warm crust can soften the cream mixture and make your layers slide around.
Step 5: Make the Green Layer
Place softened cream cheese into a large mixing bowl.
Beat it with an electric mixer for approximately 1–2 minutes.
The cream cheese should become smooth and creamy.
Add:
- ½ cup powdered sugar
- 1 teaspoon vanilla
- ¼–½ teaspoon peppermint extract
Beat again until completely smooth.
Scrape down the sides of the bowl with a spatula.
Step 6: Add the Green Color
Add 2–3 drops of green food coloring.
Mix.
Look at the color before adding more.
You want a soft pastel Christmas green, rather than a very dark green.
If necessary, add another drop.
Remember that the color will look slightly lighter after you fold in the whipped topping.
Step 7: Fold in Whipped Topping
Add 1 cup whipped topping.
Instead of aggressively mixing it, gently fold it into the cream cheese mixture.
Use a large spatula.
Fold from the bottom of the bowl upward until the mixture becomes light and fluffy.
This helps preserve the airy texture.
Step 8: Add the Green Layer
Make sure the cookie crust is completely cool.
Spoon the green mixture over the crust.
Spread it into an even layer.
Take your time here.
The more level this layer is, the cleaner your final dessert will look.
Place the pan in the refrigerator for 15–20 minutes.
This gives the layer a chance to firm slightly before you add the next layer.
Step 9: Make the White Layer
Place softened cream cheese into a clean bowl.
Beat until smooth.
Add:
- ½ cup powdered sugar
- 1 teaspoon vanilla
Beat until creamy.
Add 1½ cups whipped topping.
Fold gently until everything is combined.
The finished mixture should be smooth, fluffy, and spreadable.
Step 10: Add the White Layer
Remove the pan from the refrigerator.
Spoon the white cream mixture over the green layer.
Spread gently with an offset spatula.
Don’t press too hard.
You don’t want to disturb or mix the green layer underneath.
Once smooth, return the pan to the refrigerator.
Chill for approximately 20–30 minutes.
❤️ Step 11: Prepare the Red Gelatin
Pour the cherry gelatin powder into a medium bowl.
Add:
1 cup boiling water.
Whisk continuously until every grain of gelatin has dissolved.
This may take 1–2 minutes.
Then add:
½ cup cold water.
Stir well.
⚠️ The Most Important Gelatin Step
Do not pour hot gelatin over your cream layer.
The heat can melt the white layer and create a marbled mess.
Instead, allow the gelatin mixture to cool to room temperature.
You want it:
- Cool to the touch
- Still liquid
- Not beginning to completely set
If it’s still warm, wait longer.
Step 12: Add Fruit, If Desired
If you’re using fruit, gently fold in:
1 cup chopped strawberries or cherries.
Pat fresh fruit dry with paper towels first.
Excess moisture can affect the gelatin.
For an especially smooth, clean-looking red layer, you can simply leave the fruit out.
Step 13: Add the Red Layer
Remove the chilled dessert from the refrigerator.
Instead of immediately dumping the gelatin onto the surface, slowly spoon it over the white layer.
Start around the edges and work toward the center.
This prevents the force of the liquid from creating holes in the cream.
Place the pan in the refrigerator.
Step 14: Let the Gelatin Set
Refrigerate for at least 2–3 hours.
The gelatin should become completely firm.
You should be able to gently touch the surface without it feeling liquid or wobbly.
For the best results, allow the entire dessert to chill for 4–6 hours total.
Overnight is even better.
☁️ Step 15: Add the Whipped Topping
Once the gelatin has completely set, spread approximately 2 cups whipped topping over the top.
Create either:
Smooth finish
Use an offset spatula to create a perfectly smooth white surface.
Rustic finish
Leave little swirls and peaks in the whipped topping.
The rustic finish is particularly attractive for a Christmas dessert.
🎄 Step 16: Decorate
Now comes the fun part!
Scatter:
- Red candies
- Green candies
- Red sprinkles
- Green sprinkles
- White sprinkles
- Crushed peppermint
over the whipped topping.
For a presentation similar to the photograph, place several larger red and green candies first.
Then fill the empty spaces with tiny sprinkles.
Don’t worry about making the decoration perfectly symmetrical. A slightly random arrangement gives it that cheerful Christmas-dessert appearance.
❄️ Step 17: Final Chill
Return the finished dessert to the refrigerator for another 30–60 minutes.
This gives the topping time to firm up.
If you’re serving it the next day, cover the pan loosely with plastic wrap or foil and refrigerate overnight.
🔪 How to Get Beautiful Clean Slices
This is one of the most important tricks.
Use a long, sharp knife.
Run the knife under hot water.
Dry it completely.
Make one clean cut.
Wipe the knife clean.
Repeat with hot water and a clean towel before each cut.
This prevents the red gelatin and cream layers from smearing into one another.
🎄 The Finished Layers
When you cut into the dessert, you should see:
🤍 Whipped topping
↓
❤️ Red cherry gelatin
↓
🤍 White cheesecake cream
↓
💚 Mint-green cream
↓
🤎 Buttery cookie crust
That dramatic red, white, green, and brown combination is what makes this dessert such a beautiful Christmas centerpiece.
⭐ Troubleshooting
My gelatin layer is melting the cream.
The gelatin was too warm.
Let it cool completely before pouring it over the dessert.
My layers are sliding apart.
The individual layers probably weren’t chilled long enough.
Give each cream layer time to firm before adding the next one.
My green layer isn’t fluffy.
The whipped topping may have been overmixed.
Fold it gently rather than beating it vigorously.
My crust is falling apart.
It may not have contained enough butter or wasn’t pressed firmly enough.
Make sure the crumbs are evenly moistened and compact the crust firmly.
My gelatin isn’t setting.
Check that you used the correct amount of water.
Too much liquid can prevent gelatin from becoming firm.
Allow it several hours in the refrigerator before deciding that it hasn’t set.
🧊 Storage
Keep the dessert covered and refrigerated.
It is best enjoyed within 2–3 days.
Because the dessert contains cream and dairy products, don’t leave it sitting at room temperature for extended periods.
For parties, keep the main pan refrigerated and bring out smaller portions as needed.
🎁 Make It Ahead
This recipe is ideal for holiday entertaining.
The day before
Prepare the entire dessert through the decorating stage.
Cover and refrigerate overnight.
On Christmas Day
Add a few fresh candies and sprinkles immediately before serving to make the topping look freshly decorated.
💡 Recipe Notes
For a stronger Christmas flavor: Add a small amount of peppermint extract to the green layer.
For a less minty dessert: Use vanilla extract only.
For a more intense green: Add a tiny amount of additional food coloring.
For a deeper red: Cherry gelatin usually gives a beautiful red color, but you can use strawberry gelatin as well.
For extra crunch: Sprinkle finely chopped nuts over the cookie crust before adding the green layer.
For a chocolate version: Replace the vanilla cookie crumbs with chocolate cookie crumbs.
For individual desserts: Assemble the same layers in small clear dessert cups rather than one large baking dish.
❤️🎄 Recipe Card
Christmas Red, Green & White Layered Dessert
Ingredients
Crust
- 2½ cups cookie crumbs
- ½ cup melted butter
- 2 tbsp sugar
- ¼ tsp salt
Green layer
- 8 oz cream cheese
- ½ cup powdered sugar
- 1 tsp vanilla
- ¼–½ tsp peppermint extract
- Green food coloring
- 1 cup whipped topping
White layer
- 8 oz cream cheese
- ½ cup powdered sugar
- 1 tsp vanilla
- 1½ cups whipped topping
Red layer
- 3 oz cherry gelatin
- 1 cup boiling water
- ½ cup cold water
- 1 cup chopped fruit, optional
Topping
- 2 cups whipped topping
- Red and green candies
- Christmas sprinkles
Directions
- Prepare a 9 × 13-inch pan.
- Combine cookie crumbs, butter, sugar, and salt.
- Press firmly into the pan.
- Bake at 350°F for 8–10 minutes and cool completely.
- Beat cream cheese, powdered sugar, vanilla, and peppermint for the green layer.
- Add green coloring and fold in whipped topping.
- Spread over the cooled crust and chill.
- Prepare the white cream layer and spread over the green layer.
- Dissolve cherry gelatin in boiling water and add cold water.
- Cool gelatin completely.
- Carefully spoon gelatin over the white layer.
- Refrigerate until completely set, about 2–3 hours.
- Spread whipped topping over the set gelatin.
- Decorate with red and green candies and sprinkles.
- Chill another 30–60 minutes.
- Slice with a hot, clean knife and serve cold.
🎄 Best tip: Make it the night before Christmas. The overnight chilling gives you the firmest layers, cleanest slices, and best overall texture.

